How to draw a cup of coffee
In one of our previous drawing lessons we showed how to draw a cup of tea, but coffee lovers asked us to create a lesson about their favorite drink. When we talk about tea, we most often imagine a classic cup, but not everything is so simple with coffee. People drink coffee from porcelain cups, glass glasses and paper cups. Today we will show you how to draw a cup of coffee .
How to paint a cup of coffee in watercolor: 2 options
How nice it is to enjoy a cup of aromatic coffee in the morning... mm, you immediately wake up and are ready to accomplish great things: write a new article, learn a new song, play a new melody on the guitar, or draw a cup of coffee and hang it on your moodboard so that this drawing is always in front of you eyes and inspired throughout the day!
I'll show you two simple options for painting a cup of coffee in watercolor , so you can choose what you like and experiment further by adding different details.
How to draw a cup of coffee?
Coffee is a popular drink. We can very often meet a person on the street with a glass of coffee, and a morning cup of coffee with a croissant has become a standard breakfast. The popularity of the drink also influences the fact that it began to be depicted more and more often. Moreover, now many artists are even trying to paint coffee pictures.
We will look at how to draw a cup of coffee, as well as additional elements that can make the drawing better.
What material to use to draw a cup of coffee
In any drawing, it is important to work with materials that are convenient for you. After all, it is the comfort of work that determines whether you will enjoy the process of creating a picture.
Choose a material to your taste - it can be simple pencils, soft graphic materials, watercolors, felt-tip pens.
At the same time, when performing any drawing, take a responsible approach to the choice of paper. When working with a simple pencil, choose a dense, smooth base; on such a surface the pencil will glide easily and will not leave dirty marks.
When working with soft graphic materials such as sanguine, sauce, pastel or charcoal, give preference to porous, rough paper. Its structure will retain the pigment and the design will be bright and rich.
What rules should you follow when drawing a cup of coffee?
To correctly depict a cup, you need to learn how to correctly draw simple geometric shapes. This can be learned in academic drawing classes.
In order for the cup to look realistic, it is necessary to correctly draw the ellipses and their opening, to understand how the position of the object and the viewing angle affect changes in the image.
Pay attention to composition. Even the simplest drawing can be turned into a masterpiece, and the most skillfully designed into a failure.
Place the item close to the top edge of the canvas. This composition is always pleasing to the eye, feel free to add additional elements, but do not overload the image.
How to draw a cup of coffee with children quickly
Here are some examples of quick sketches. At the same time, all our cups will have human features. Let's start with the cup with the mustache.
We start working from the top, draw an ellipse and the volume of the cup. It has fairly thick walls.
We finish drawing the entire cup. The bottom of the cup should be a semi-oval, this will help make the cup voluminous.
We finish drawing funny elements - eyes and mustaches.
We work in color. At the same time, we remember that round shapes have light, shadow and partial shade.
Drawing of a cup with coffee and marshmallows
Draw a low round cup. Remember that all lines should be round and soft.
Draw the parts of the cup's face.
Add marshmallows. At the same time, we depict them not just as rectangles. We also see their volume.
We color our image with markers, paint or colored pencils.
A glass of coffee is suitable for little ones, since there is no transfer of volume in the construction.
Draw the shape of a glass.
Add the lid and eyes.
Add color to our drawing.
How to draw additional elements for a cup of coffee
To make the picture look interesting and unusual, you can use additional elements - marshmallows, high foam, sweets. Let's look at how to draw a croissant.
To draw a croissant, we will need paper and colored graphic material - colored pencils, pastels or felt-tip pens.
Outlining the shape. We work immediately with colored material, so as not to waste time and effort on cleaning the image in the future. We dial the first tone.
We add a more contrasting color to the outline and some parts.
We emphasize the details with an even darker shade. At the same time, we work softly, the colors should gently transition into each other.
Use dark brown to complete the outline.
Using gray we work on the surroundings, thus creating a shadow.
Don't be afraid to experiment with your image. Constantly working on such drawings and sketches will help develop artistic skills and imagination.
Source
Cup of coffee: top view
If you are an avid coffee lover, then you probably know that one of the trendy details that always accompanies any cup of coffee is a unique pattern on the coffee foam. Let's try to depict just such coffee.
To do this, let's take an unusual angle of a coffee mug - a top view. It will help us present the drawing on the foam in the best possible way, because this is where we want to concentrate the viewer’s attention.
Draw a circle in the center of the sheet. This will be the top of the cup.
Add thickness to the cup, it is ceramic after all - make an outer outline around the circle at a distance of 2-3 mm.
Then add another stroke around the circle, but this time inside it - this will be the border of the poured coffee.
Add a handle to the mug.
Draw the image with a thin black outline.
Then start working on the design on the foam. Give free rein to your imagination. Make a light pencil sketch.
Fill it with pale blue paint and leave until completely dry.
Wet the brush with water and fill the entire space around the design on the foam with it. This is necessary so that the colors applied next flow beautifully into each other, and the result is a shade of coffee that is recognizable to everyone.
Take the yellow color and apply it to the design in the center of the cup.
Then take a dark orange color and fill the remaining areas around the edges with it.
After that, introduce the brown color, starting adding it from the top left of the drawing and moving down to the right, blurring it a little.
Leave the work until completely dry.
Take a dark brown color and apply a shadow in the upper left part of the cup, next to its wall.
Use a dark gray color to paint a shadow on the handle of the cup, as well as a falling shadow on the surface of the table.
Dry the painting again. Erase all pencil lines.
How to beautifully draw a glass with a pencil - 3 lessons for beginners
If every time you see a gorgeous oil painting, you freeze and catch yourself thinking that you WOULD LIKE to be able to do that too - it’s time to pick up a brush!
The impossible will become possible! The first step is already waiting for you in my article - https://nyblog.ru/kak-nauchitsya-risovat-maslom-s-nulya/.
We will learn how to select materials and how much they cost, what the first strokes should be, WE will DRAW a picture together and even figure out how to sell it!
All this is free using the link above)
Draw a glass easily and simply with a simple pencil. In the new article we show how to draw a glass in 3 versions - step-by-step lessons + 10 photos and videos.
How to draw a glass with a pencil step by step
A beautiful drawing of a glass can also be useful to you in still lifes made with oil or acrylic paints, in sketches made with markers, or simply with a pencil or even a ballpoint pen.
After all, a glass is such a universal object that is often found in still life drawings and in general works on the theme of kitchen utensils, food, and so on.
Glasses, as well as the purposes for drawing them, can be completely different - from glass to paper, smooth and shaped, empty or filled with something. Depending on what type of glass you need to draw, the basic structure of the drawing will be built, as well as additional nuances - shading, applying highlights, and so on.
In this article, we tried to put together for you step-by-step master classes on drawing a glass with a simple pencil. Three detailed master classes await you. From this article you will learn how to beautifully draw a glass of water, how to draw a faceted glass, and also how to draw a paper cup for coffee.
Each of these master classes will help you learn how to draw a glass of different shapes and textures. And having learned to draw such a simple object as a glass, you can begin to draw no less interesting cups, mugs and other utensils.
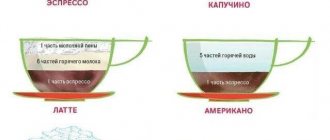
Basics of coffee art
Drawings using different techniques are made on a coffee drink with dense milk foam - cappuccino. Less commonly, espresso and latte are decorated in this way. The contrasting image is obtained due to the fact that the white foam does not occupy the entire surface of the cup. This is achieved by pouring the frothed milk unevenly or by raising dark coffee to the top.
The color of the design will be richer if you sprinkle the surface of the espresso with cocoa powder, and then pour in the milk. To draw on milk foam, depending on the chosen technique, you will need:
- a thin wooden stick (a toothpick will do);
- pitcher, or milk jug (small steel jug with
- sharp spout for frothing milk);
- stencils;
- strainer;
- sprinkles (cinnamon, cocoa, grated chocolate, crushed
- nuts);
- syrup.
All the necessary equipment can be purchased in stores specializing in coffee, coffee makers and coffee machines. Milk should be whipped with a cappuccino maker directly in the milk jug so as not to overfill the hot foam.
Equipment for a master class on pencil drawing
To draw a glass easily and quickly, you will need good quality thick paper, a well-sharpened pencil, an eraser and a stationery knife, so that if the pencil breaks or becomes dull, you can sharpen it to perfection.
For the following master classes on drawing a glass you will need:
- paper for drawing - it is best to take paper with the inscription GOZNAK (you can also use watercolor, but we do not recommend drawing on a thin landscape sheet);
- simple pencils HB, 4B.
- eraser.
It is very important to select quality materials for your work, even when you are still learning. After all, the quality of your work will depend on their quality, partly
Yes, that's all you need! To learn how to draw correctly, we advise you to print a reference picture in advance, or open it on your computer in good quality and expansion. To complete these master classes, you can use our final drawing, which is provided at the end of each master class, as a reference.
If you can’t find a suitable reference, then you can try to draw from life - for this you will need to take a glass of water, the simplest and smoothest one, a classic faceted glass and a small paper cup for coffee.
How I create coffee drawings on paper
Greetings to all! I really, really love to draw, especially with coffee solution on paper. My first experiments with coffee on paper appeared in 2010. At that time I couldn’t drink coffee at all, and I decided to try drawing with it to feel my favorite aroma. Happened! Now I can’t stop. I’m experimenting with adding cocoa, chicory, vanilla, cinnamon, sugar. I combine coffee with watercolors.
I decided to make this little master class on coffee drawings so that anyone could try to create their own fragrant fairy tale. It's not difficult: you'll need coffee, brushes, high-quality watercolor paper, clean water, napkins, and a frame with glass.
First, you need to prepare a coffee solution for drawing. I tried boiling ground coffee until thick, but now I use a simplified recipe. I take instant granulated coffee (it’s important that it’s not the cheapest) and add enough water to make a creamy mass. I definitely give it time to settle, then the solution becomes uniformly glossy and syrupy without any bubbles or undissolved granules.
Synthetic brushes are suitable: round and oval, thin (No. 2, 4) and thicker (No. 8, for example). Natural round brushes will also work.
Paper is a material on which you definitely shouldn’t skimp. The density should be 270-300 g/m2 (ordinary watercolor paper - about 200 g/m2 - will not work). I use a good French torchon, it has cotton fibers added to it, suitable for wet watercolors and for coffee drawings, of course. I like paper from Fontaine, Lana, and Canson.
Water is needed to adjust the tone. If a dark shade is required, take the coffee solution in its pure form; if a lighter tone is required, dilute it with water. It turns out a wonderful sepia stretch in color.
Napkins are useful for blotting off excess moisture from brushes.
Well, at the end you need to protect the dried drawing with glass and frame it. If this is not done, the drawing may deteriorate from moisture. Unplanned droplets leave light spots and streaks on the image. It is not necessary to fix the drawing with varnish, because... Coffee under glass is preserved perfectly, but the varnish can ruin all the charm of the aroma of a coffee masterpiece.
So, the materials are ready. Let's get started. First the background. We moisten the paper with clean water, and then apply coffee with a wide brush or a piece of padding polyester, in my example quite evenly. Let's wait a little until the background dries a little. Now, in the most general terms, with spots, we denote the composition of the picture. From light to dark, from general to specific. More and more details and richness of tone. The last drawing is done with a thin brush over the dried drawing. To get light highlights, you can use another move: drop water on top of the coffee and quickly blot it with a napkin - a light spot will remain.
Here are step-by-step photos of a bouquet of sunflowers (the last image is scanned, so the color difference is):
The desire to experiment and a creative mood help! A new MK is planned 
With best wishes, Yulia Grechukhina.
The easiest way to draw a glass of water
In this master class you will learn how to draw a voluminous, transparent glass of water.
Stage 1 – building a glass
We begin to construct a glass with an HB pencil. We outline the height of the glass and the width of the glass. Please note that the upper part of the glass, that is, its neck, is wider than the base of the glass. We begin to designate ellipses. Please note that the upper ellipses should be narrower than the lower ones. When drawing an ellipse, we draw a rectangle and divide it both along the axis of symmetry and in half. But at the same time, we still try to make the lower part a little larger than the upper.
Thus, we draw three ellipses: the upper ellipse, where we have the neck, the lower one, where the base is, and just a little above the base to show the thickness of the base of our glass. After this, we outline the water level and, approximately, the border of the shadow in the glass.
Stage 2 – showing the depth of the glass
We erase with an eraser all unnecessary construction lines - the far part of the ellipse, the axis of symmetry, restore the lines that we need if they are worn out.
We take a 4B pencil and begin to complement the tone of the top of the glass. We slightly shade the neck, darken the thickness of the glass, and, starting from the center, with such circular shapes, we begin to show the volume and depth of our glass, alternating dark and light tones. We try to make it a little darker in some places, a little bit lighter in others. Also, at this stage we darken the edges of the glass a little.
Stage 3 – pencil shading
How to beautifully shade a glass? Apply the tone to the bottom of the glass, where the water and its base are located. We darken the water more than the top of the glass than the neck, and in the same way we begin, with more circular movements, to apply dark and light strokes with the flat part of the pencil.
Stage 4 – adding highlights
Let's do the shading. With a little stroke we emphasize the edges of the glass, darken the part where we have water, then use the tip of a pencil to darken the darkest places on the glass - they are on the base. At the end, we use an eraser to show the highlights and the plane of our glass. In order to show that our glass is materially appropriate, we must make one light highlight, not very clear, vertically.
Thus, we have a drawn glass glass, with a shadow from the water, which helps to convey the volume of this very glass, and now it does not seem so flat, which is very important when you draw a realistic drawing.
How to draw a realistic glass of coffee in Photoshop
In this tutorial I will show you how to create a realistic coffee glass using Photoshop Smart Objects.
Materials:
Archive
Step 1. Let's start by creating a document sized 1500x2200 px with a resolution of 300dpi. Fill the background with #c2c2c2 color.
Step 2. Below, the individual parts of the glass are shown in different colors.
Step 3. Add auxiliary lines, one vertical in the center at 750 px and one horizontal at 1100 px.
Step 4. Let's start with the glass. Draw an outline using the Pen Tool (P), to create individual parts of the glass, use the Add to path area (+) command. Once one side is created, activate it and press CTRL+ALT+T to copy, then move the central round node to the center of the right line, right-click on the outline and select Flip Horizontal . Create a bottom using the Ellipse Tool (Ellipse) (U), click on the vertical auxiliary line and press ALT to make it symmetrical with respect to the horizontal line. Create a new layer and fill the outline of the glass with white.
Step 5. Repeat the above steps to create the area where the label will be placed.
Step 6. The lid is created in the same way. When you create the bottom part, make sure that the Substract from path area (-) command is enabled.
Step 7. For the back inner part of the lid, copy its lower ellipse and edit the shape using Add to path area (+) and fill it with gray color #adadad .
Step 8. The ring on the lid is created in the same way as the glass. The bottom should be the same width as the lid.
Step 9. Now that all the parts needed for the glass are created, you can edit the document size to approximately 1100x650 px. Make sure all layers are visible and in place as shown below.
Step 10 Now it's time to breathe some life into the composition. Let's start with the glass. Create a shape slightly larger than a glass. Apply a gradient fill as shown below. Create a new layer above the gradient layer. Select the gradient fill and the new layer and press CTRL+E to merge them together. Activate Free Transform (CTRL+T) and adjust the layer to the shape of the glass. Then press ALT+CTRL+G to create a clipping mask for the gradient. Now the gradient layer only affects the glass area.
Step 11. Using the Pen Tool (P) create a contour in the shape of the bottom of the glass. Create a new layer above the gradient layer and name it “Bottom Shadow”. Create a stroke from the outline using a soft brush (B) of black color. Then apply a clipping mask (ALT+CTRL+G).
Step 12 Add a gradient for the lid in the same way as we did with the glass. To edit the contour, use Edit – Transform – Warp (Editing – Transformation – Distortion). Before transforming, do not forget to create a new layer and combine it with the gradient one.
Step 13. In the same way as for the glass, we will create a shadow for the lid. Name the layer “Bottom Shadow of Lid.” We will also need to create light in the upper part, we will use the method described above, but this time we will take a white brush. We call the layer “Light”.
Step 14: Double-click on the layer with the ring on the cover to bring up the Layer Style , apply Gradient Overlay , click OK and then right-click on the layer styles and select Create Layers . . As a result, the gradient fill will appear on a separate layer.
Step 15 . Create a path along the contour of the bottom of the lid ring. Create a new “Bottom Shadow” layer and transform the path into a stroke using a large black brush. On a new layer, create another stroke, but this time use a brush with a smaller diameter. Reduce the Opacity of both layers to 10% and create a clipping mask for each.
Step 16. Draw a new outline. Create a layer above the light layer for the lid. Convert the path into a stroke using a black brush, then go Filter – Blur – Gaussian Blur (Filter – Blur – Gaussian Blur) with a radius of 6px. Reduce Opacity to 30%. Duplicate the layer and place it above the layer with the lid ring, reduce the Opacity to 18%.
Step 17 Double-click on the layer with the back inner part of the lid and apply Gradient Overlay (Gradient Overlay).
Step 18. Now let's create a shadow from the label on the glass. Draw an outline and add a new layer “Label Shadow” above the glass shadow layer. Convert the outline into a stroke using a black brush. Duplicate the layer (CTRL+J) and name it “Label Shadow 2”, reduce the Opacity to 10%. Select the first layer and apply Filter – Blur – Gaussian Blur (Filter – Blur – Gaussian Blur) with a radius of 10 px, reduce Opacity (Opacity) to 40%. Make sure to create a clipping mask for both layers.
Step 19 Create two new layers above the label layer and name them “Left Gradient” and “Right Gradient”. Create a clipping mask for them. Using the Gradient Tool (G) create a gradient fill as shown below. Change the blending mode of both layers to Multiply .
Step 20. To make the glass more rounded, add light to the sides of the label. Draw an outline on each side of the label and create a new layer above the gradient layer we created in the previous step. We call it “Side Light”. Convert the outline into a stroke using a soft white brush, apply a Gaussian Blur , create a clipping mask (CTRL+ALT+G) and set the blending mode to Soft Light .
Step 21. The lid also casts a shadow on the label, so let's create another shadow using the Pen Tool (Pen) (P). Add a new layer above the “Side Light” layer, call it “Lid Shadow” and create a clipping mask for it. Convert the outline into a stroke and blur it a little with the Gaussian Blur , then set the blending mode to Multiply with Opacity 25%.
(Fig.22)
Step 22 Repeat Step 21, but this time call the layer “Lid Shadow 2.”
Step 23. Now let's add graphics to the label, create an outline slightly larger than the label, and fill it with any color. Name the layer “Picture on Label”. Reduce the Opacity of the layer so that you can see what is underneath it. Place this layer above the label layer. Right-click on the layer and select Convert to Smart Object. Now you can transform the layer. Press CTRL+T to bring up Free Transform and go into Warp mode. We are trying to transform the layer as you see below. It is important that everything is neat, otherwise do not count on a good result.
Step 24. Right-click on the “Label Design” layer and select Edit Contents . You can remove the color that fills the object and import the texture. Go to File - Save , this will update the smart object in the original file. The glass should now look like below. If the label turns out distorted, you can always go back to Step 23 and fix it, just press CTRL+T and go to Warp .
Step 25. We return to the window in which we edit the smart object “Drawing on the label”. The text on the label can be placed anywhere, but for a more realistic result, do not place it strictly in the center. We write any text and apply a texture to it or simply fill it with color.
Step 26 To make the text look more realistic, we need to diversify it with color. Let's start by creating a new layer above the text layer and calling it "Gradient". Using the Gradient Tool (G), create a black gradient from the edge to the center, then apply a clipping mask and reduce the Opacity to 28%. Create a new layer above the one you just worked with and call it “Light”. Create a white gradient on the other side and apply a clipping mask. We do the same actions with other text.
Step 27 Create a new layer above the texture layer and call it “Light”, draw a line in the center with a large soft white brush. Reduce Opacity to 15%. Duplicate (CTRL+J) the layer and add a layer mask. Apply a black gradient from bottom to center to the layer mask. Reduce Opacity by 20%. Save and close the window with the “Picture on Label” smart object.
Step 28. The illuminated side of the label is too dark, so change the blending mode of the “Side Light” layer to Screen (Lightening) with Opacity (Opacity) 70%.
Step 29. To prevent the glass from hanging in the air, add shadows. Go to the layer with the glass and duplicate the bottom part. Create a new fill layer in the form of a copy and name it “Shadow”. Place the layer below the background one. Go to Filter – Blur – Motion Blur (Filter – Blur – Motion Blur) with a blur of 225 px, then apply Gaussian Blur (Gaussian Blur) with a radius of 6 px. Duplicate the layer (CTRL+J) and stretch it in width by 120%. Reduce Opacity to 20%. Then we transform the original. Reduce its width by 80% and reduce Opacity (Opacity) by 60%.
Step 30 Select all layers except the background one and press CTRL+G to group them. We call the group “Glass”. Duplicate it and press CTRL+E to combine it into one layer. We reduce the copy to 60% relative to the original and move it to the left side of the document. To make the image more interesting, we will create a depth effect. Go to Filter – Blur – Lens Blur (Filter – Blur – Blur with shallow depth of field) with a radius of 21 px. Duplicate (CTRL+J) the layer and move the new glass to the other side.
Step 31 To add more detail to the image, we will create a small wooden spoon. To do this, we will use the technique with which we created the glass, fill the layer with color and call it “Spoon”. Right-click on the layer and select Convert to Smart Object . Now we must transform the spoon so that it lies in front of the glass. You can always go back and change something if the result does not suit you.
Step 32 . Since we are creating a wooden spoon, we need to create a wood texture for it. Let's move on to editing the smart object. Create a new layer and fill it with color #9f7948. Create another new layer above the previous one. Go to Filter – Render – Clouds (Filter – Rendering – Clouds), press CTRL + T and stretch the layer by 400%. Then go Filter – Blur – Motion Blur (Filter – Blur – Motion Blur) and enter Distance (Distance) 200 px and Angle (Angle) 90 degrees. Next, go to Image – Adjustments – Posterize (Image – Correction – Posterization), enter the value 20 and click OK. Press CTRL+L to bring up Levels and increase the contrast of the image. Now we need to add fibers. Go to Filter – Noise – Add Noise (Filter – Noise – Add Noise), set the value to 50% and click OK. Then Filter – Blur – Motion Blur (Filter – Blur – Motion Blur) with Distance (Distance) 10 px and Angle (Angle) 90 degrees. Change the layer blending mode to Multiply .
To add dimension to the texture, duplicate (CTRL+J) the layer and name the copy “Light”. Invert it (CTRL+I). Press CTRL+L and set the values to 75-1.0-140. Change the blending mode to Screen (Lightening) and reduce Opacity (Opacity) to 50%. Place the layer under the original and slightly move it down. Select all the created layers and add a clipping mask to them (CTR+ALT+G).
Add text to the spoon and apply layer styles. Save the window with the smart object and close it.
Step 34. Hold CTRL and click on the “Spoon” layer thumbnail to load the selection. Create a new layer under the spoon layer and fill the selection with black. Duplicate (CTRL+J) the layer. We call the copy “Side” and the original “Shadow”. Press CTRL+T to transform both layers and move them down slightly so that the spoon becomes voluminous. Activate the “Side” layer and use a black brush (B) with a hardness of 100% to fill the empty edge of the spoon to connect its top and bottom parts. Double-click on the layer with the mouse to bring up Layer Style and apply Color Overlay . Then right-click on the layer effects and select Create Layers . Create a new layer above the “Side” layer and name it “Light”. Apply a Clipping Mask to it (CTRL+ALT+G), then take a soft white brush (B) and paint the light on the side of the spoon. After that, change the layer blending mode to Overlay .
Step 35 . To add light to the top of the spoon, create a new layer above the Spoon smart object and apply a clipping mask to it (CTRL+ALT+G). Take a large (>1000px) white brush (B) and paint a spot in the center of the spoon. Reduce Opacity to 58% and change the layer blending mode to Screen . Duplicate (CTRL+J) this layer and place a copy under the original. Change its blending mode to Overlay (Overlap) and Opacity (Opacity) 20%. Move this layer a little to the left and down. Bevel&Emboss layer style to the smart object .
Step 36 Activate the “Shadow” layer and apply the Motion Blur and Gaussian Blur to edit the shadow.
Step 37 Add a new horizontal construction line. Create a new layer above the background layer and call it “Light”, apply a large radial gradient in the center of the document. Duplicate (CTRL+J) the layer and rename both layers to “Top Light” and “Bottom Light”. Apply a layer mask to both layers as shown below. Unbind the mask to the “Top Light” layer (to do this, click on the button in the form of chain links between the layer and the mask in the Layers Panel), then stretch the gradient to the top to capture the central part of the document. Change the Opacity of the layer to 90%. After this, we activate the binding again.
Step 38 Create a new layer and fill it with black. Use a mask to hide the area shown below. Reduce the Opacity of the layer to 30%.
I also added a border and some text and placed a small label in the top corner.
Option from the translator:
Author: Gorm Haraldsson Translator : Max Enin Link to source
How to draw a coffee glass
At the last master class, we learn to draw a glass of coffee. In our master class, the glass will have a lid, but you can leave it without it by drawing the coffee itself in the glass.
Stage 1 – sketch of a glass
We use an HB pencil. We make a sketch of a glass with a drink - we indicate the height, axis of symmetry, and width. The widest part of the glass should be slightly less than twice as tall. We make the base of the glass a little narrower, and the neck in the same way, a little narrower. Next, we indicate the height of the lid. The height of the lid should be one third of the glass. We also outline the width of the lid - it should be larger than the width of the glass itself.
Stage 2 – draw the shape of the glass
We outline and draw ellipses - the lowest ellipse at the base is the widest, and the higher the ellipse, the narrower it becomes.
Stage 3 – connect the bottom of the glass with the widest part of the glass
From the edges of the widest ellipse, raise two vertical lines up and draw another ellipse. Next, to the same part of the ellipse that we just drew, we add another thin ellipse in order to show the side. Next, from the very top ellipse, we lower two lines down and connect the top ellipse with the bottom one so that we have a lid.
Drawing coffee on paper
Drawings with coffee solution
Author: Terentyeva Natalya Sergeevna, teacher of fine arts and technology, Municipal Educational Institution “Sheragulskaya Secondary School”, Tulunsky district, Novotroitsk village. Description of work: the material may be useful to art teachers, kindergarten teachers, and art studio directors. The described technique can be tried by all lovers of unconventional drawing. Most often, children love to draw, but sometimes they become bored, tiring and uninteresting. While they are little, parents draw with them with paints, felt-tip pens, and pencils. And when they grow up, we come to school - again the same set of art materials. Boring…. So gradually the interest in drawing fades away. In drawing lessons, I use little tricks - unconventional drawing techniques that keep students occupied and involved in the creative process, thereby creating a desire to do such an interesting activity. Original drawing reveals creative abilities, allows you to feel various art materials, their character and mood. We tried all the currently known techniques of non-traditional drawing: drawing with the palm, edge, fingers, drawing with crumpled paper or a plastic bag, monotype, scratching, spraying, wet, threadography, blotography, imprinting, drawing with plasticine, drawing with grains, finger painting, foam rubber , egg mosaic. The novelty of the environment, an unusual start to work, beautiful and varied materials, interesting non-repetitive tasks, the possibility of choice - all this helps prevent monotony and boredom, and ensures liveliness and spontaneity. Currently, many artists have begun to widely use non-traditional painting techniques in their work, for example, the British artist Ian Davey uses swan feathers as canvases, Bashir Sultani, a talented artist of Afghan origin, paints with salt. In their work, artists use different materials, such as chocolate, sand, vegetables, etc. We learned that you can even draw with a coffee solution. Coffee drawings as a non-traditional technique have been known since 2004. Coffee pigment is applied to paper using an ordinary art brush. Instant coffee is ideal for creating designs in a single, warm color scheme. The more saturated the solution, the brighter the tone.
These are the drawings we got. We advise you to try this technique!!! The ability to be creative is a specific human feature, which makes it possible not only to use reality, but also to modify it. Coffee drawings are a completely new, unconventional, little-studied technique. Original drawing reveals creativity and allows you to feel such an unusual artistic material as coffee, its character and mood. They write about coffee at all times, Many legends tell about it. They show interest in him for a reason; the magical power enchants him. Alexander Gushchin History of coffee.
The discovery of coffee is described in numerous legends. One of them leads to the old monastery of Ethiopia. One evening around 850 AD. The monks of this monastery were struck by the extraordinary vigor of the monastery goats. A little “investigation” led the monks to unknown berries that the goats were eating that day. Fueled by curiosity, the monks decided to try the dark red fruits themselves. However, greatly disappointed in the bitter taste, they threw the grains into the fire. Soon after, an amazing aroma suddenly spread. The monks put out the fire and brewed a black drink from randomly roasted coffee beans. Since then, a drink prepared according to an accidentally discovered recipe has helped them stay awake during night prayers. From Ethiopia, along the Red Sea, coffee came to Arabia, the homeland of Islam, where the Persians soon liked it. However, full recognition was still a long way off. Coffee achieved its real victory only in the 16th century. From Arabia, coffee traveled through Mecca to Cairo and Constantinople (Istanbul). It was there, in 1554, that the first Coffee Tavern was opened. It was only much later that coffee came to Western Europe. For comparison, the Spaniards brought Cocoa home already in 1528; Europe began to thank the Dutch for tea only in 1610. And the first bags of coffee arrived here from Turkey on the ships of the Venetian fleet in 1615. When the Turks were forced to lift the siege of Vienna in 1683, they left behind 500 bags of coffee. This reserve allowed the Pole Kolszycki, who became acquainted with coffee as a precious drink in Turkey, to open the first Viennese “House of Coffee,” which later became the basis of the world-famous Viennese coffee house culture.
Coffee is a drink and an excellent material for drawing, a source of inspiration!
We recommend watching:
How to draw a winter tree Cats. Drawing lesson for children African painting tingatinga. Master class Making a scene for the last bell at school with your own hands with photos
Similar articles:
Mosaic drawing. Master Class
An unconventional technique for painting a landscape with semolina for primary schoolchildren
Drawing using scratch paper technique on the theme “Autumn”
Drawing technique Spray
Unconventional drawing using the “Griffinage” technique. Master Class