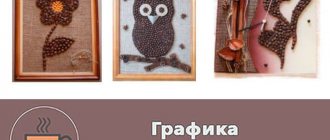
Cards and crafts made from coffee beans
Birthday of a friend, mother, grandmother. A postcard or painting made from coffee beans is an ideal gift.
This is what will decorate your kitchen decor and fit perfectly into any interior.
You will need:
- green or brown cardboard;
- felt-tip pen;
- glue;
- coffee beans;
- scissors;
- glue brush;
- picture from the phone of the cup.
Draw a cup on a piece of cardboard and cover it with coffee beans in one direction. Let it dry. The picture is ready. The smell of coffee will accompany the picture for a long time.
How to make a vase with coffee beans
First you need to degrease the surface of the base, cover it with acrylic primer and paint it in a dark color (so that the gaps between the coffee beans do not show through).
When the paint is dry, start gluing the coffee beans: apply a small drop to the grain and apply it to the base. When it sticks to the surface, glue the next one, trying to place it as close as possible to the previous one. Do not cover the entire surface: this will make the vase look more impressive.
You can add originality: cover the simplest glass vase or glass with a jute cord: apply glue to a degreased surface and carefully wrap the vase with twine in a spiral, layer by layer. When the glue has dried, add a cotton lace ribbon and glue the coffee beans in a random pattern or in a pattern.
Coffee beans go well with linen fabric and burlap. You can make an original panel using linen as a base, and lay out the outline drawing with coffee beans. Use bamboo stems as a frame.
Cup decor
You will need:
- cup;
- glue;
- coffee beans.
Your favorite cup is cracked, but you still want it to make you happy? Cover it with coffee beans and when heated it will emit a pleasant coffee aroma.
The cup can be covered either completely or with a triangle. But when gluing, choose non-toxic glue. And try not to leave sticky stains on the coffee. Nice and useful!
Apply the glue with a brush and choose the glue to suit your fantasy plan; for example, PVA will fly off when heated. It's better to take silicone.
Note!
How to make a rose from paper - the best ideas for DIY crafts + master classes on creating a rose from paper (160 photos)Craft letter - TOP 120 photo reviews of craft letter. Simple diagrams + step-by-step DIY instructions
- Crafts made from nut shells: the best step-by-step master classes on creating DIY crafts with photo examples of finished works
DIY coffee bouquet. Master class with step-by-step photos
How to make a coffee bouquet with your own hands.
Step-by-step instructions with photos Author: Evgenia Valerievna Romanova, teacher-psychologist at MBDOU “Kindergarten No. 6” in the city of Vilyuchinsk, Kamchatka Territory. The master class is intended for teachers and parents in joint activities with children. Purpose: a pleasant and fragrant gift for family and friends. Goal: Development of creativity, imagination and taste.
Materials: small plastic jar, wooden clothespins, construction plaster, 2 m wire, wooden skewers, twine, coffee beans, Moment Crystal glue, glue gun, various beads and acrylic stones, cattail ball, butterfly, Kinder eggs -surprise".
Tools: wire cutters, scissors, awl. Rules for working with Moment glue: 1. Moment glue is very toxic, so children should not use it. 2. Do not open the glue with your teeth. 3. Apply glue with a brush or glue stick. 4. When working with glue, use a napkin. 5. Avoid getting glue on clothes, hands and face; In case of contact, rinse thoroughly with water. Rules for working with a glue gun: 1. The glue gun operates from an electrical outlet, so children should not use it without adult supervision. 2. Be careful when working, melted glue may cause burns. 3. Do not leave the heat gun turned on unattended, protect the device from falling. 4. When heated, a small amount of glue may leak out of the gun, so always place the device on a stand with the nozzle down, preferably on a piece of cardboard. 5. It is not recommended to use the gun continuously for more than 1 hour. 6. Surface to be bonded, parts must be clean and dry. 7. The glue dries very quickly, so the parts need to be fastened quickly while the glue is hot. We pierce the Kinder Surprise eggs with an awl.
On the opposite side of the hole, we begin to glue the eggs with twine. We apply the thread tightly. So we make three blanks. We begin to decorate the eggs covered with thread with coffee beans. First we lay out the flower from the grains. Glue the coffee beans vertically into the next row.
We also glue the grains onto the next rows vertically close to the previous row.
Thus, we get a flower, which we place on a wire pre-wrapped with thread.
Three coffee flowers and one large wooden bead were “planted” on the four ends of two wires; we sealed the hole of the bead with coffee.
Separately, we will glue more beads of different sizes with coffee beans onto wooden skewers.
We glue the plastic jar with parts from wooden clothespins.
The pieces for the composition are ready, all that remains is to put everything together. Pour the gypsum solution into the jar until it hardens, carefully insert all the skewers and stems with flowers. When the plaster hardens well, decorate the bottom and edges of the jar with various beads and acrylic stones. We decorate the tub with a flower made of rope with a coffee bean in the center of the flower.
View from above.
Coffee-fruit composition.
We recommend watching:
DIY flower ball made from napkins. Peonies made from satin ribbons. Master class with step-by-step photos Crafts from coffee beans and twine Flower made from salt dough. Master class with step-by-step photos
Similar articles:
DIY paper flowers gifts
Crafts from cotton pads. Daisies
DIY spring crafts. Spring flowers
Crafts on the topic: Spring with primary schoolchildren
Paper hyacinth. Master Class
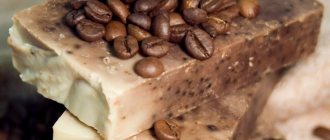
Candles for scent
For a cafe or at home. DIY autumn crafts from the gifts of nature. You will need:
- Maple leaves;
- cones;
- dish;
- wax, thread or candle;
- coffee beans;
Candles can be made in two ways: from wax with coffee beans inside and pasted over with coffee beans. To do this you will need a candle mold and thread.
Take a disposable glass, it is better to choose from cardboard and put a layer of coffee and thread. Melt the wax and pour a little into the mold. Then 10 coffee beans. Wax and again 10 coffee beans. Let cool.
As a result, you will have a candle with the scent of wax and coffee. Place it on a plate with maple leaves and add a pinch of fantasy, cover it with pine cones.
You can make candles from used coffee by adding already used coffee to wax. Eco-friendly, economical, cost-effective!
Note!
- Mushroom craft - reviews of ready-made DIY crafts + step-by-step instructions and diagrams for children (180 photos)
Crafts from toilet rolls: step-by-step instructions for creating crafts. Master classes with simple work schemes (140 photos)
- Crafts from corrugated paper - step-by-step master classes on how to create crafts from corrugated paper with your own hands + photo diagrams
You can also simply paste coffee over a candle and make a composition on a table, and enjoy the smell as the candle gradually burns.
Coffee tree and fragrant Christmas trees
A kind of “coffee bonsai”. Interior mini-topiary from handmade. No matter how catchy a name you come up with, it still won’t convey the uniqueness of these homemade gizmos.
The Christmas tree is a little easier to make because of its shape. Build a cone from whatman paper, paint it cinnamon, cover it with even rows of grains, including the bottom, and decorate it with balls-beads and beaded garlands. For a special mood, sprinkle with semolina snow. The New Year's souvenir is ready.
The gracefulness of the tree is given by the intricately curved long trunk. Its role is played by a thick wire wrapped in twine. One end goes into a cup of plaster (choose a tall one for stability), and the other is the focal point of the composition - a light ball. It could be a plastic ball, a candy box, polystyrene foam, etc., use your imagination. Before creating the shell on the ball, paint it chocolate color.
Magnet
Crafts from coffee beans are made all year round. On Valentine's Day, you can give a magnet in the shape of a heart. The symbol of all lovers.
You will need:
- scissors;
- material;
- cardboard;
- magnet;
- glue;
- glue brush;
- coffee beans;
- pencil;
Take a pencil and cardboard and draw a heart. Take scissors and cut it out. We place the cardboard on the material, and draw + 2 cm on the material a heart and a second heart the same as the blank. First we glue the big heart, bend our 2 cm and glue it well, then glue the small heart on top. Let it dry.
Cover the heart with coffee beans. And here we turn on our imagination. We can peel off everything, we can peel off half of it, we can just peel it off along the edge and insert a photo, for example.
Then after everything is dry, glue on the magnet. The magnet will decorate any refrigerator and will remind you of romantic evenings with its aroma.
Coffee miracle
From coffee beans you can make not only a tree, but also an unusually beautiful craft in the form of a cup and saucer. If you don’t believe in this, then this master class is especially for you.
The process of making a craft with your own hands can be followed using the example of a master class with a step-by-step and detailed description and photo.
In order to make this product, you will need a cup and saucer, a glue gun, copper wire, twine and, of course, coffee beans. To decorate the work we used lace.
The first step is to decorate the inside of the cup. To do this, roll the twine as much as possible. We do this by holding the threads in our fingers, but not on the table surface.
Cover the bottom of the cup with glue.
We put the already rolled twine on top. Then tightly wrap the bottom of the cup with twine, adding a little glue.
You shouldn’t completely decorate the cup at once. It is better to do this gradually and let the glue dry.
After the internal part is completely formed, we move on to the external part. Tape the edges very tightly and carefully. There is no need to cut the threads.
It's best to find a cup without a handle, but if there isn't one, you'll need to knock off the handle of the cup.
Related article: Master class on partial knitting: models with photos and videos
When we have completely finished wrapping the product, cut off the thread, drop a drop of glue onto the end of the rope and glue the thread very tightly to the cup.
Here we have the cup ready.
Now we move on to the second stage of our work - designing the saucer. Degrease it.
We will also start work from the inside. First, we wind a little twine in our hands, then glue it to the middle of the saucer and then wrap the entire inner part, tightly pressing the thread to the thread.
As we work, we apply glue so that the twine sticks well to the saucer.
We work the edges well and move to the bottom of the plate. When the saucer is completely formed, cut the twine and tightly glue the end of the thread to the saucer.
The third step for this craft is to prepare thick copper wire for the future handle of the cup.
Using pliers, we bite off the length we need.
Next we need to form the handle of the cup.
First we wrap it with tape.
And then we wrap it, like other parts, with twine.
Here's what we got at this stage:
Of course, we need to glue the finished handle to the cup and let the glue dry.
We have already done the main work. Just a little left! Take a couple of lace ribbons.
Measure the circumference of the cup and cut the exact same length of ribbons.
The first step is to glue the dark pink ribbon.
Glue light lace on top of the dark one.
You can also decorate a cup with coffee beans. Look how beautiful it turns out in the photo:
We also decorate the saucer with lace. The first step is to cover the edges of the saucer with dark lace.
Glue a light ribbon on top.
In the inside of the cup, it is necessary to secure the copper wire with a thick layer of glue. Let it dry.
The cup in the air is almost ready. Last step.
We fix the bowl in the air using wire. We strengthen the copper on the saucer more tightly.
Related article: Patterns of crocheted flowers - violets poppies roses calla lilies
We wrap both parts of the wire with tape.
We glue the coffee beans tightly throughout this workpiece.
Let's decorate the cup with a bow. To do this, take a lace and a couple of grains.
We tie a small bow on the cup, and glue a couple of coffee beans to one hanging end of the lace.
We cover the entire product with acrylic clear varnish.
Now the craft made from coffee beans is ready. We hope you enjoyed this master class.
"Tree of Happiness"
A tree that brings happiness or a talisman to preserve happiness.
You will need:
- gypsum;
- water;
- mixing bowl;
- form;
- glue;
- ribbon;
- coffee beans;
- tree trunk tube or handle;
- rope;
- glue brush;
- flowerpot
A silicone mold of your choice, maybe a rose, a ball, or a square, fill the bowl with plaster and dilute with water. Fill the mold with the mixture. Do not fill out the entire form. Let it harden.
Wrap the rope around the tube or handle, fix the end of the rope with glue. Fill the flowerpot with plaster and place the tube or handle in the middle. Let it harden. Cover the inside of the flowerpot so that the plaster is not visible.
You can also cover the flowerpot itself. Turn the flowerpot over and place the stem on the mold, fill it with plaster and let it harden, now you can paste the grains over the base.
Tie a ribbon around the base of the form and decorate it with a chic bow. The coffee tree craft is ready.
Manufacturing technique
First you need to start preparing the crown of the future tree. Paint it with paint or wrap it in fabric. This is necessary so that the white ball does not show through between the coffee beans. While the crown dries, you can decorate the base if you want to paint it.
Read here - Polymer clay spoons - design ideas for polymer spoons and tips on how to decorate dishes with polymer clay (80 photos)
Sort the coffee beans that you will use to decorate the crown. Unsightly broken grains will not work, so feel free to remove them.
Sort into 4 parts: use even grains without defects to cover the top and bottom parts. Round grains can be used to decorate the base. And small ones are suitable for small gaps.
Before you start decorating the crown, prepare a hole for the trunk. It must be at least 2.5 cm deep.
Finishing the crown is the most exciting process in making wood. Finishing can be done in several ways:
Coffee beans are glued to the base like a honeycomb. You can place them on any side, vertically or horizontally, mixing small and large grains. It all depends only on your imagination. But do not forget that the most beautiful and even ones need to be glued on top of the workpiece.
Another method will allow you to cover the ball with a minimum of time. For this method it is better to use transparent construction adhesive. Apply glue directly to the ball and spread it out a little, take a handful of grains and sprinkle it on the area covered with glue. Now you can carefully distribute the grains over the surface.
Since the hardening time of construction glue is longer than that of hot glue, this will allow you to adjust the position of the grains on the crown of the future topiary. But in this case they will be arranged randomly, which will not spoil your craft at all.
You can also glue the grains in two layers, with this technique there will be no gaps between the grains, and the tree will turn out to be very voluminous.
When using any technique, be sure to leave room around the hole for the barrel.
It's time to beautifully decorate the trunk of our topiary. Determining the height of the future trunk is quite easy: to the height of the pot, add half the diameter of the ball and the distance from the pot to the base of the ball.
NOTE!
- What you can make from foamiran with your own hands: interesting ideas and photo examples of crafts
- Nutrition for pregnant women
Beaded pendant - weaving patterns and decoration design options. How to make stylish pendants with your own hands (70 photos)
You can paint the trunk with paint or wrap it with ribbon, twine or twine. To prevent the tape or twine from slipping, wrap duct tape around the trunk and then secure the edges with tape or glue.
It's time to collect our future tree. Insert the barrel into the ball and secure it with glue. Decorate the space around the trunk.
Our tree is almost ready. You can plant it in a pot. Dilute the plaster and fill the container, not reaching the edge, place the tree and hold for a couple of minutes until the mixture hardens. To ensure the plaster is completely dry, leave it to dry for 10 hours.
After drying, you can begin decorating the base. Decorate it with grains, moss, pebbles or beads. Show your imagination and individuality. And your tree will sparkle with bright colors.
Master class on making a painting
You'll need:
- a picture (you can draw it, or you can print it);
- coffee beans;
- rope;
- glue
- cardboard;
- scissors;
- eyes (decor can be bought at a hardware store)
We will conduct a master class on coffee crafts.
How to choose a painting
It is advisable to choose a picture with contours without small details. For example, a dog, elephant or other animal.
You have chosen a painting, what to do? If we printed it on A4 sheet, but not on cardboard, then we glue it onto cardboard.
What's next? We dip the rope in glue and glue it to the frame of the picture. Then glue on the eyes.
We decorate our animal with coffee beans. We take paints and decorate the coffee beans. Beautiful, unusual, bright!
Clock decor
You will need:
- watch;
- coffee beans;
- glue;
- phosphate paint, sold in stores, in different colors.
We take the watch and cover it with coffee beans. Let it dry. We paint numbers on the dried dial. Gold paint adds sophistication to the watch. During the day, the numbers gain energy, and in the evening they glow.